One of the recent data visualization tools that is being very popular among the customers is Power BI. As the tool is new and Microsoft is enhancing their features day by day, there are issues, a developer could face that has never been encountered earlier.
As a developer, I have a chance to work dedicatedly from installing the report server configuring them, apply the Brand Package and manage security implementation on the reports.
This document will describe configuration and security implementations steps for Power BI Report Server, hoping to help other people with similar Implementation.
What is Power BI Report Server?
Power Bi Report Server is an on premise report server with a web portal in which you display and manage reports and KPIs. Along with it come the tools to create power bi reports, paginated reports, mobile reports and KPIs. Power BI Report Server is an extension of SSRS with similar look and feel, just enhanced functionality to host PBIX reports.
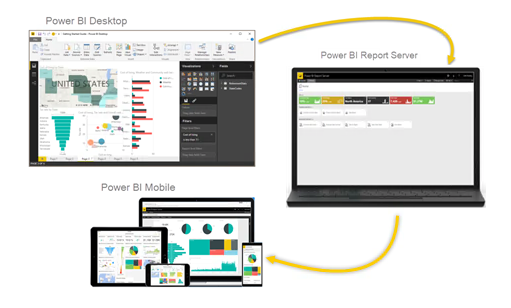 Create, deploy, and manage Power BI, mobile and paginated reports on premises with the range of ready-to-use tools and services that Power BI Report Server provides.
Components and Requirements
Power BI Report Server
The installation is straightforward and Microsoft documents are helpful enough to install successfully.
You can follow the link below,
https://docs.microsoft.com/en-us/power-bi/report-server/install-report-server
We have used below system configuration:
RAM: 32 GB
Windows Server: 2016 Datacenter
System Type: 64-bit Operating System, x64-based processor
Database: SQL Server 2016 SP2 Enterprise Edition
ORACLE Client
Reports, we are working, are based on ORACLE. Once the reports are published into the report server, it will use the server machine settings to run them. Therefore, it needs ORACLE client to be installed on the server itself.
SQL Server Database
Just like SSRS, Power BI Report Server also uses two SQL Server DBs to store report server object metadata. Therefore, there should be a SQL server enterprise instance installed locally or remotely.
Challenges and Mitigations
- The user must be a part of local admin group.
- TNSNAMES.ORA file should be configured properly with TNS alias name for the DB connection.
- The path of the TNSNAMES.ORA file to be set in environment variable ‘TNS_ADMIN’. Check Oracle bin folder for ORACLE.KEY file to see where to add TNS_ADMIN variable.
- The Oracle bin path to be set with admin privileges.
- That should be the Enterprise Edition of SQL server. Developer Edition or RDS will not help.
- We have used SQL Server 2016 SP2 Enterprise Edition
Configure Report Server
After installing the Power BI Report Server, we need to configure the report service from Report Server Configuration Manager.
The steps are simple and directed in Microsoft docs. PFB the link:
https://docs.microsoft.com/en-us/power-bi/report-server/install-report-server
We have used below details, which worked successfully.
- Service Account
My domain user account credentials.
Web Service URL
- Virtual Directory: <Any meaningful name that describes the purpose>
- IP Address: All Assigned
- TCP Port: 80
- The URL will be generated automatically
Database
Go to Change Database and point the report server to the SQL Server Enterprise Edition instance. PFB the link:
Web Portal URL
- Virtual Directory: <Any name that would be used in the URL>
- The URL will be generated automatically
Note: The rest is not required for the basic configuration.
Challenges and Mitigations
- Network Issues:
If you get any network related error,
- You can check if the connection properties have “Obtain DNS Server Address Automatically” checked. You can check it from, Control Panel >> Network and Internet >> Network Connections >> Right Click on the Connection >> Properties >> TCP IPv4 >> Properties >> Select Obtain DNS Server Address Automatically.
- Check if TCP/IP is enabled on the machine.
- Check if the TCP port is open.
- Check if the SQL Server metadata DB is in the same domain and firewall is not blocking anything.
- Database Permission Issues:
If you get any DB related error,
- The SQL server should be the Enterprise Edition. RDS instance or Developer Edition will not work.
- The User credentials used to configure the DB should have SYSADMIN and Public roles on the SQL Server.
- Local installation and remote instance both will work. PFB the link:
Connecting to Report Server DB
You can connect to the report server DB instance from SQL Server Management Studio to check if the user has the roles required or the DBs are created.
Challenges and Mitigations
- If there is any issue logging in, first check with the admin if you have the correct credentials.
- The server name will be <hostname>, <port no>.
Ex. 150.9.8.15, 1166
- If there is any problem logging in from the server machine, try to log in from any other machine in the same domain.
Connecting to Report Service
After successfully configuring the report server, you should be able to log in to the reporting service from SQL Server Management Studio. This can be used to check the default roles, create or edit new roles and manage the scheduling.
If the server is configured correctly, you will be able to see ‘PowerBIReportServer’ service running on the machine where server is installed.
You can connect to the reporting service from SQL Server Management Studio. Go to object explorer and select ‘Reporting Services’. You should see the Reporting Server instance in the dropdown. Enter credentials and Log in.
Challenges and Mitigations
- If there is no instance in the dropdown, you need to register the service in SSMS. In order to do that,
View >> Registered Servers >> Reporting Services >> Local Server Groups >> Right Click >> New Server Registration >> Put the ‘Web Service URL’ and test.
Start the web portal
- Open your web browser. Learn about what browser versions are supported for managing and viewing Power BI Report Server and the Report Viewer Controls. See this list of supported web browsers and versions.
- In the address bar, type the web portal URL.
- By default, the URL is [https://[ComputerName]/reports%3c/a%3e.%3c/li%3e/r/n]https://[ComputerName]/reports.
- The report server might be configured to use a specific port. For example,
[https://[ComputerName]:80/reports%3c/a]https://[ComputerName]:80/reports
Or
[https://[ComputerName]:8080/reports%3c/a%3e%3c/li%3e/r/n%3c/ol%3e/r/n%3cp%3eYou]https://[ComputerName]:8080/reports
You can use the web portal to perform the following tasks:
- View, search, print, and subscribe to reports.
- Create, secure, and maintain the folder hierarchy to organize items on the server.
- Configure role-based security that determines access to items and operations.
- Configure report execution properties, report history, and report parameters.
- Create shared schedules and shared data sources to make schedules and data source connections more manageable.
- Create data-driven subscriptions that role out reports to a large recipient list.
- Create linked reports to reuse and repurpose an existing report in different ways.
- Download common tools such as Report Builder and Mobile Report Publisher.
- Create KPIs.
- Send feedback or make feature requests.
Publishing Report to the Report Server
After you are done with configuring the report server successfully, you should be able to access it through the Web Portal URL. You can use the same URL to save the reports to the report server.
 Challenges and Mitigations
- Check if the URL is correct
- Check if you are logged in to the server with the same credentials
- You can get some “Unexpected Error Encountered” while saving the reports to the report server. You can use the Upload functionality from the web portal itself.
Manage Security on the Server
There are cases when you might have to set some security to the folders, objects and the reports in the server based on the users or user groups created in the domain. For this, you can use Manage functionality from the web portal and assign roles to the users. PFB the link:
You have essentially three layers of access to the report file security in Power BI Report Server.
- The portal itself can be secured. You can and should limit access to the reports by only allowing specific users or group’s access to the report portal.
- Folders can be used to provide more granular security over a group of assets in the report portal. In the image above, I created a folder called PBI Secure Reports. A specific AD group has access to this folder. If a user does not have permissions to the folder, the folder does not show up in the portal and they cannot access the folder or the assets, including Power BI reports, stored in this folder.
- Individual reports can be secured as well. I never recommend this option as it becomes administratively difficult to manage. However, the capability is there is a single asset needs to be secured in this fashion.
Mapping SSRS Roles to Power BI Functions
The portal, folders, and files are secured using SSRS roles. Here is a high-level summary of the roles and how it affects Power BI Reports.
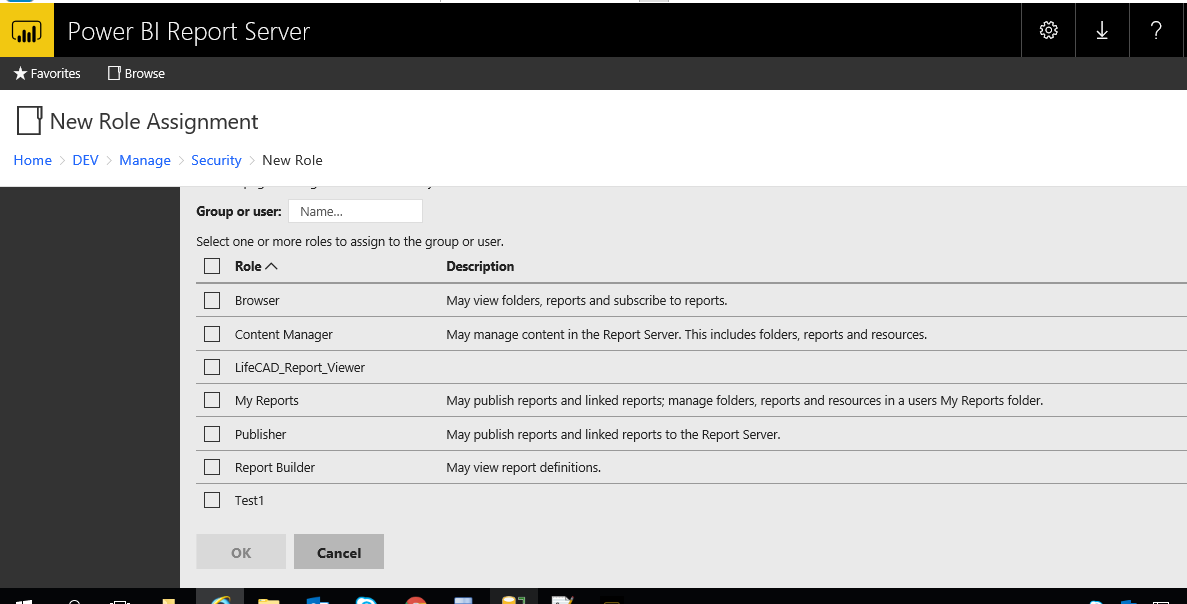
- Browser – This is similar to a read only function or if you would deliver the report as a Power BI App in the service. This should be used by anyone who needs access to the report, but does not create content.
- Content Manager – This is for a content creator with admin privileges. This role can manage content and user access.
- Publisher – This is for content creators who do not need to manage users. Most content creators fall into this category.
- Report Builder – does not apply to Power BI Reports, which use Power BI Desktop to develop reports.
https://docs.microsoft.com/en-us/power-bi/report-server/admin-handbook-overview
Challenges and Mitigations
- The user must be granted access to the report server.
- In order to manage security from the web portal, the user must be a part of local admin group.
- The user, on which security is applied, cannot be a part of local administrator group. Users in admin group will by default have access to all the folder objects irrespective of the security.
Avoid Deploying to the Portal Home Page
I would recommend you not allow Power BI reports to be deployed to the primary portal, but create folders to manage the group of content creators and managers based on the department or group level needs.
Reports deployed to the home page of the portal should be managed as enterprise assets. Use the folders and related security groups to manage who can deploy at this level.
Branding the web portal
You can alter the appearance of the web portal by branding it to your business. This is done through a brand package. The brand package is designed so you do not need deep cascading style sheet (CSS) knowledge to create it.
Creating the brand package
A brand package for Reporting Services consists of three items and is packaged as a zip file.
- color.json
- metadata.xml
- logo.png (optional)
Applying the brand package to the web portal
To add, download, or remove a brand package, you can do the following.
- Select the gear in the upper right.
- Select Site Settings.
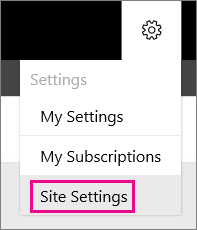
- Select Branding.
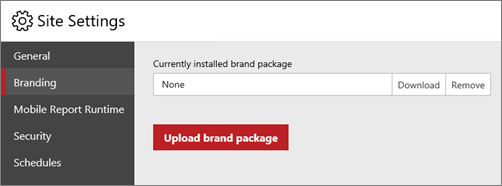
Currently installed brand package will either display the name of the package that has been uploaded, or it will display none.
Upload brand package will apply the package to the web portal. You will see it take effect immediately.
You can also Download or Remove the package. Removing the package will reset the web portal to the default brand immediately.
The steps are simple and directed in Microsoft docs. PFB the link:
https://docs.microsoft.com/en-us/sql/reporting-services/branding-the-web-portal?view=sql-server-2017
For Example,
Before Applying brand package – This is a by default package for Power BI Report Server
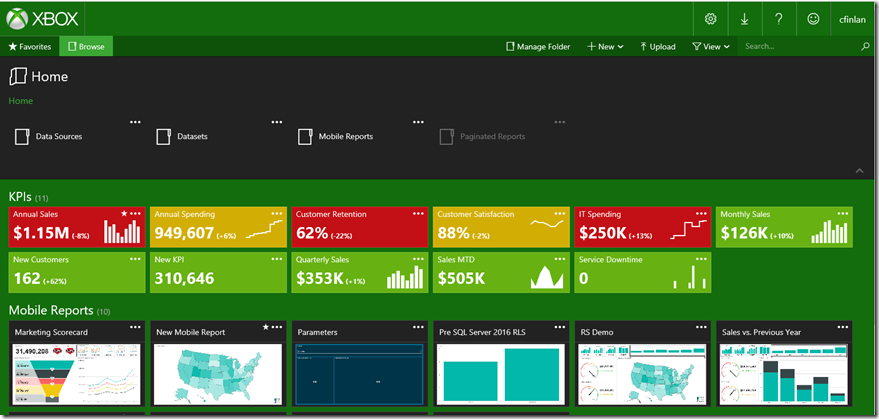
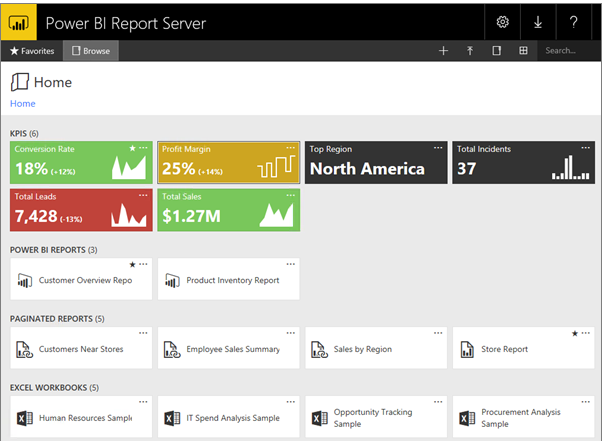 After Applying brand package – This is a XBOX brand Package

Wrap Up
I would like to extend a special thanks to Nityanand and Rudra for their guidance and support on implementing Power BI Report Server. Thanks Nitin for the help on this topic.


